Showing posts with label ardour. Show all posts

Monday, November 17, 2008

Using the Wii Remote to Control Hydrogen and Ardour on Ubuntu Linux

I've found two great videos on using the Nintendo Wii's Wiimote to control audio programs in Ubuntu Studio (or any linux distro). The first is posted at msound.org
Drumming With WiiMote, Hydrogen and Itouch
. The second is the prototype done by the Ardour development team using the WiiMote to control Ardour.


Drumming With a WiiMote in Hydrogen


See the original post at msound.org:
Drumming With WiiMote, Hydrogen and Itouch


If you can't access YouTube or don't have flash, becks from msound.org has connected his WiiMote as a midi controller to the hydrogen using a PERL script that can be downloaded from here. He's also using the Apple Ipod Touch in a similar fashion. Lastly, he shows that fancy tools don't increase your drumming ability :)

Using a WiiMote in Ardour


See the original Ardour post: Prototype Wiimote Control For Ardour Added.

In this video, James Bond from the Ardour Dev team connects the WiiMote up to Ardour through the options menu (You'll need to follow the instructions here). Features available are:
  • Button A starts and stops the transport (play and stop).
  • D-Pad left/right moves the play head left and right.
  • D-Pad up/down scrolls through tracks (vertically).
  • Plus and minus buttons zoom in and out.
  • Button 1 enables recording on a track (arms the track).
  • Button 2 enables recording on the session (you can then press A to start recording).
  • Button B deletes the last recording if you fluffed it (Don't ever press the B Button, 007).
  • Home resets the play head to the beginning of the track (or the selected marker).
Unfortunately, you'll need some Linux experience to get your WiiMote working with these programs. You'll also need Bluetooth on your PC. Hopefully we'll see the Ardour support in the next release.

Monday, October 20, 2008

New Ardour Recommended Plugin Effects Page

Sorry it's been so long since the last post. Brian and I have been insanely busy with work.

One of the biggest problems with using Ardour is the ridiculous number of LADSPA effects plugins that are available. It's not easy to find a good plugin and you end up wasting a lot of time trying all the different compressors, reverbs and EQ's.

To help you out, Ardour has posted a new page on plugins with recommended EQ, dynamics, reverbs and other plugins. It also tells you where to get more plugins if you're collecting them:)
If you want to recommend a plugin to Ardour, you can comment on the original plugin page annoucement.

Other posts you might find interesting:
My Favourite Linux Audio Effects
Using a Bus to Route Effects in Ardour
Audio Recording in Ubuntu Studio - Part 3: Adding Effects to the Ardour Drumtrack
An Overview of Compression
Sound Mixing Tips: EQ vs Volume

Wednesday, August 27, 2008

Using a Bus to Route Effects in Ardour

When using computer audio effects, one must always bear in mind that your poor computer has to calculate the effect output everytime you play back your tracks. So when you go too crazy with effects, your computer will probably seize up, roll-over and die! To save your computer, it is important to use buses to route repeated effects in Ardour.

Okay, maybe that sounds like complete gibberish... but please bear with me and you'll soon understand what I mean. Let's take an example of a multichannel recording of a drumbeat in Ardour (i.e. one channel for snare, one for the kick drum, etc.). For each drum, you would want to add certain effects like an EQ, reverb, and compressor. One way to do this is to add the effects to each channel like in the figure below.


Since you would want the same sounding reverb on each drum, your poor computer has to calculate the same thing multiple times. This is unnecessary because you can create a bus and route all the drum channels to it and then only put one reverb on the bus. This method achieves the same sound whilst your computer does less. You can do this by following the steps below:

Firstly, you need to create a new bus. Go to Session, and click on Add Track/Bus. Configure the window that appears to look like the one shown below. i.e. select Busses and Stereo.


You now need to route all your drum channels to the bus (I have renamed mine to be DrumBus). You do this by right-clicking on the black rectangle below the volume fader (this is called the "post effects" for the track). A menu should appear and you must select New Send... Configure yours to look like the one shown below. You do this by firstly adding an output (click the Add Output button) and then selecting where you want the output to go. In this case you choose DrumBus/in1 and DrumBus/in2 from the Ardour tab on the right of the window.


Since you have rerouted the output of the each drum track, it no longer needs to be connected to the Master Bus. So disconnect it by clicking on the Output button (just above the Comments button) at the bottm of each drum channel and select Disconnect. Your drums should all be sounding through your Drum bus. This means that if you adjust the DrumBus volume, all the drums' volumes should change. It also means that any effects you use on the drum bus will be applied over the whole drum kit. The figure below shows how the bus greatly reduces the amount of reverb effects used.


Note that I have left the EQs and Compressors in each channel and not on the bus. This is done because the EQs and Compressors are set differently on each drum and thus cannot be applied to the whole kit via the bus. I hope you found this tip useful, and that your computer will also appreciate it :). A special thanks goes out to Jakob Lund for suggesting this method of adding multiple effects.

Other posts you might find interesting:
Audio Recording in Ubuntu Studio - Part 3: Adding Effects to the Ardour Drumtrack
My Favourite Linux Audio Effects
An Overview of Compression
Panning for Gold : How to Pan Tracks
Mastering Tips: A Picture Says a Thousand Words

Tuesday, August 5, 2008

Audio Recording in Ubuntu Studio - Part 3: Adding Effects to the Ardour Drumtrack

Okay, by now you should have a drum track recorded in Ardour as the first step for your recording project. If not, check out Audio Recording in Ubuntu Studio - Part 2: Recording a Hydrogen Drumbeat. The drum track really is the backbone to your recording because it is often filled with the most emotion (i.e. build-ups, double tempos, break-downs etc.) However, in order to allow the recording artists to feel the full emotion of the song, we must add a few basic effects. These effects can then be tweaked towards the end of the project for the final mixdown.

Let's take a look at what we have. The figure below shows my multiple drum track recording of Sunday Bloody Sunday in Ardour.


It is important to record the drums as dry (i.e. no effects) as possible because this will make your recording more versatile. You can easily add effects to a dry recording but you cannot easily remove recorded effects. The above tracks are therefore dry and can be heard from the MP3 below.

DryDrums.mp3 (555 kB)

We now need to add effects to each drum by using Ardour's Mixer. The mixer can be opened from Ardour's Window menu by selecting Show Mixer (or pressing Alt+M). This should look similar to the one below, minus all the effects on each drum.


You can add effects to each drum by right-clicking in the black rectangle above each drum's level fader and selecting New Plugin. A list of all your installed effects will be shown, choose the relevant effect and select Connect. You should now see your effect appear in the black rectangle. The effect should still be bypassed so double click on it and a window displaying all the effect's options will appear. You can vary the effect options and click the Bypass button to switch the effect on or off.

Now that you know how to add effects, which effects best suit drums? Firstly, if you want a natural sounding drum kit, stay away from EQ. The effect which is easiest and most effective for use on drums is reverb. I used the TAP Reverberator which requires a a stereo input. I therefore used the Hilbert Tranformer to convert my mono track to a stereo one. I also used the TAP Equalizer to make my kit sound a bit more like U2's, but as I said earlier, be subtle when using the EQ. The drum track with added effects can be heard from the MP3 below.

WetDrums.mp3 (555 kB)

Compressors are very useful for drums because they make the drums sound powerful. However, you can add these during the mixing stage of the project. The early use of effects is merely to inspire the artists with a emotion-provoking drum track. For more information on some cool Linux effects, check out this post: My Favourite Linux Audio Effects.

In the next part of the Audio Recording in Ubuntu Studio series, our song should start taking shape as we add a guitar track.

Other posts you might find interesting:
Audio Recording in Ubuntu Studio - Part 1: Plan your Project
Audio Recording in Ubuntu Studio - Part 2: Record a Hydrogen Drumbeat
Overview of Compression
Hydrogen Drumbeat Templates - A Non-drummers Best Friend
Panning for Gold

Wednesday, July 16, 2008

Audio Recording in Ubuntu Studio - Part 2: Record a Hydrogen Drumbeat

Okay, so you've planned your recording project like I told you to do in Audio Recording in Ubuntu Studio - Part 1: Plan your Project. You now want to create a Hydrogen drumbeat as the backbone to your track.

To begin, start up JACK and then Hydrogen. You can begin messing around with beats and patterns to get a feel for the program. If you want a more in depth description of the Hydrogen interface check out this post: Hydrogen Drum Machine Basics.

If you are unsure of the drumbeat that you will use for the song, just write a simple one and loop it for the entire song. As long as it is set at the same timing and at the same tempo, you can replace the beat with a better one at a later stage. A useful tip to remember: always start the beat off with a count-in, it will make the recording process a lot easier and you can always remove it later. For our recording project, we are using a Hydrogen beat for U2's song: Sunday Bloody Sunday - it is available for download here: Sunday Bloodly Sunday Hydrogen Drumbeat.

Once you have finished your beat, and you can play along to it in Hydrogen, you want to record it into Ardour. So start up Ardour and create a project with whatever name makes you sleep better at night. The Ardour interface should have only one track called Master. All the future tracks will be linked to the Master bus and then output to your soundcard. You now want to create enough tracks to record your drumbeat into. Hydrogen can either output one stereo track or a stereo track for each instrument/drum. I prefer to use multiple outputs, because it's more versatile - but if you are just laying down a simple beat, rather use the single stereo output (it is easier). I explain how to enable multiple outputs in Hydrogen in this post: Multiple Outputs for Hydrogen.

To add a track in Ardour, click on File and select Add Track. A window appears which allows you to chose how many tracks you want to add and whether those tracks are going to be stereo or mono.

If you are using Multiple outputs, select mono and add about six tracks. You can then change the names of the tracks by clicking in the track name and typing what you like. Use relevant names like snare, kick, crash, etc. it will only make it easier for you later.

If you are using just one stereo output, select stereo and add one track only. Name it Drums.

You now need to connect the Hydrogen outputs to the Ardour inputs, you do this from JACK. Open the JACK connections kit by clicking on the Connect button. This looks like the below figure.


Expand the Hydrogen tab under Outputs and the Ardour tab under Inputs. You now need to connect the relevant drum outputs to the inputs of Ardour. The Hydrogen outputs are unfortunately labeled as numbers, so you have to look in Hydrogen and determine which number links to which drum. Pan each Hydrogen instrument/drum fully to the left from the Hydrogen mixer. Then link only the left output of the instrument to the mono Ardour input.

Once all your connections are linked up correctly, you can start recording. Go back to Ardour and change the tempo so that it is the same as that found in Hydrogen. You can change it by double-clicking on the number (just above the Master track) and typing in the relevant tempo. You must now arm all of the tracks by clicking on the red circle found by each track's name (Only armed tracks will be recorded to). Once all the tracks are armed, select the Record Button (red circle) on the Ardour transport bar and then select the Play button - Ardour is now recording any activity in the armed tracks. Quickly go back to Hydrogen and click the Play button. If you observe the tracks in Ardour, you will see the drum waves being recorded. When the song is finished, press the Stop button in Ardour. Your Ardour project should look something like the below figure.


Your drumbeat has now been captured into Ardour and you can leave Hydrogen behind. It is important to drag your recorded drumtrack into time with Ardour's time, if you don't, Ardour's click track will not be in time. This is done by clicking on the drumtrack and dragging it till it aligns with the bar lines of Ardour. In Audio Recording in Ubuntu Studio - Part 3: Adding Effects to the Ardour Drumtrack, I will be discussing how to add effects to your drumbeat in Ardour.

Other posts you might find interesting:
Audio Recording in Ubuntu Studio - Part 1: Plan your Project
Sunday Bloody Sunday Hydrogen Beat
Hydrogen Drumkits
Pimp my Hydrogen Beats
Making a Roll Sound Realistic
Hydrogen Drumbeat Templates - A Non-drummer's Best Friend

Wednesday, June 4, 2008

Audio Recording in Ubuntu Studio - Part 1: Plan your Project

Okay, so you've decided that you want to record a song from your home. You've also decided, like the rest of us cheapos, that you are going to use freeware. If you haven't yet decided, I recommend you use Ubuntu Studio (for why see here). Ubuntu Studio is armed with these great programs: the Best Programs in Ubuntu Studio.

When recording a project you never want to go in Swinging Blindly (especially if this is your first time). So here are a few steps to ensure that your project doesn't run out of steam half way through.

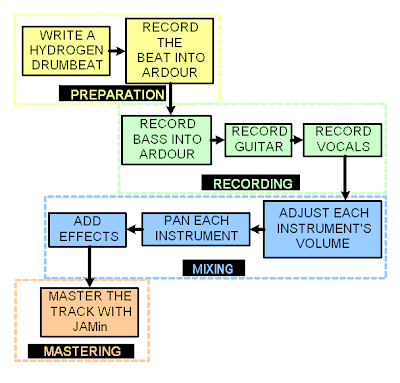
Firstly, you need to understand that there are four parts to any recording project:

  1. Preparation (setting up tempo, ensuring the song arrangement is finalised, etc.)
  2. Recording (getting your instruments' sounds into your computer)
  3. Mixing (Getting your levels right, panning each instrument, etc.)
  4. Mastering (Getting your track to sound professional)
With these steps in mind we can set up a flow diagram leading us through the project from start to finish. As an example, I plan to record a cover version of Sunday Bloody Sunday by U2. The flow diagram for my project is show below.

You can see from the figure that every instrument has its place in the recording process. It is important to put the drum track down first, even if you are using real drums. This is because it sets up the tempo for the song and provides a nice backbone for the other instruments to play along to. It is imperative that you play to a metronome, it'll be hard at first but it will always make the project easier and the song tighter. Yeah, I know...you're too cool for a metronome... you think it will destroy the emotion of the song... for the people who think that (like I did) - shut up, and listen 'cause I know, first hand, that you need a metronome.

I plan to create a blog post for every step in the process over the next few weeks. So stay tuned for the basics as well as the not-so-basics of hydrogen, recording guitar, bass, vocals, mixing, mastering, etc...etc...etc... Exciting times await!

Check out the next part of this project: Audio Recording in Ubuntu Studio - Part 2: Record a Hydrogen Drumbeat

Other posts you might find interesting:
Audio Recording in Ubuntu Studio - Part 2: Record a Hydrogen Drumbeat
Audio Recording in Ubuntu Studio - Part 3: Adding Effects to the Ardour Drumtrack
Beginner's Guide to Ubuntu Recording
What Exactly is Mastering For?
Speaker Placement

Monday, February 25, 2008

Beginners Guide to Ubuntu Recording

I am currently in the process of backing up and reinstalling Ubuntu Studio and thus don't have anything fantastic to write about this week.

I did however come across a cool article by rgrwkmn, called Recording in Ubuntu Linux (aka Free and Open Source Digital Audio Workstation)

It covers the basics of several Ubuntu Studio programs such as JACK, Patchage, Rosegarden and Ardour. I do encourage even those who consider themselves Ardour Veterans to check it out because it explains in detail what some of those damn buttons do. You know those buttons you always see but don't know what the hell they do.

Other posts you might find interesting:
The Best Programs in Ubuntu Studio
Audio Recording in Ubuntu - Part 1: Plan your Project
Audio Recording in Ubuntu - Part 2: Recording a Hydrogen Drumbeat
Audio Recording in Ubuntu - Part 3: Adding Effects to your Ardour Drumtrack
Hydrogen Drum Machine Basics

Saturday, February 16, 2008

Multiple outputs for Hydrogen

I only just discovered that you can have multiple outputs from Hydrogen instead of using a simple stereo output. This means that in Ardour, you can have a different track for each drum, i.e. separate tracks for the snare, and kick drum. You might be asking: ¨What on earth is the point of that?!¨ Well... this provides versatility when mixing down and mastering your final song. Often when you adjusting the volume levels of drums without other instruments, you will get it wrong. If you recorded your drums using a stereo input, you have little control, but if you record with multiple tracks you can edit each drum´s volume at any time. i.e. your toms can be brought up whilst your cymbals are pushed down.

This can be done in Hydrogen as follows. Go to File, Preferences select Audio System and click the box which says: Enable Track Outputs. If you now go to the connect tab in JACK, you will see many outputs under the Hydrogen heading. Each output represents an instrument in Hydrogen and can be connected to the track inputs of Ardour. My advice is that you pan all your hydrogen instruments to one side (i.e. left), and connect them to Ardour as mono tracks. Do all your panning in Ardour because this saves on processing power and RAM.

Other posts you might find interesting:
How to make a Hydrogen Drumkit
Pimp my Beats
Making a Roll Sound Realistic
My Attempt at a Hydrogen Drumkit
Hydrogen Drumkits

Tuesday, February 5, 2008

Normalisation...never heard of it!

Normalisation (or normalization for the Americans), is a very useful tool when mastering or mixing down tracks. As I´ve said earlier, mastering aims to achieve the loudest possible mix without losing too much sound quality. Normalisation helps us achieve this by doing the following. Firstly, it finds the highest peak in a track. Secondly, it raises this highest peak to the loudest it can go (normally 0 dB or 0.3 dB/98 %). And lastly, it raises everything else in the track to a point which is relative to the highest peak. Thus, normalisation creates a louder track without affecting the signal-to-noise ratio [1].

This is how one can normalise tracks in Ardour. If you look in the Edit menu of Ardour, you´ll find a dropdown called Region Operations and inside you´ll find a Normalize Region command. The shortcut for this command is `N´. So select the track you wish to normalise, then simply press `N´. Your track has now been normalised. You might even see the track peaks change a little. I recommend you do this on all your recorded tracks to achieve a louder, more professional mix.

[1] Normalisation Wiki Entry: http://en.wikipedia.org/wiki/Audio_normalization

Monday, February 4, 2008

How to Punch Record in Ardour

Punch recording is a very powerful tool. It allows one to record within a certain selected range without deleting the surrounding track. For example, if you recorded a flawless bass track except for one wrong note, you can simply select the region where the wrong note is and record over it without destroying the rest of the take.

This tutorial explains how to punch record in Ardour specifically. Firstly, a punch range must be made. This is done by clicking and dragging the cursor within the loop/punch ranges selector. After the mouse button is released a window appears saying set loop range and set punch range. Select set punch range. Your screen should now look like the figure below.


The red punch markers can be moved around as necessary. Everything which falls between these two makers will be recorded over. Before you click record, you need to ensure that the Punch In and Punch Out buttons are selected. These buttons are seen in the figure below (Green means that they are selected).

With Punch In selected it will start recording when the first punch marker is reached. If Punch Out is also selected, it will stop recording when the second marker is reached, otherwise it will record until you stop it.

I would recommend that you delete whatever you're recording over before you punch, otherwise it will remain underneath the new recording and make things messy. Also, to speed things up, you can select the Snap to Beat option in the Snap to dropdown found in the View menu. This will make any ranges you make snap to the nearest beat.

Other posts you might find interesting:
Beginner's Guide to Ubuntu Recording
Multiple Outputs for Hydrogen
Normalisation...Never Heard of it!
Interfacing JAMin with Ardour
What Exactly is Mastering for?

Monday, January 28, 2008

Interfacing JAMin with Ardour

The easiest way to interface JAMin with Ardour is to use an insert on the Master channel of the mixer. The figure below shows an screenshot of an Ardour mixer. There is an insert (in red) on the on the output of the master channel. This can be done by right-clicking in the block and selecting new insert.

Once the insert appears, double-click on it to see its details like the figure below. If JAMin is already open, it will appear as available connections for both the input and output. Set out1 to jamin:in_L and out2 to jamin:in_R. This is done by dragging the JAMin labels into the relevant block. Similarly, set in1 and in2 to jamin:out_L and jamin:out_R respectively.

Your Ardour track should now be playing through JAMin. There is one more thing to do - go to the connect tab in JACK and disconnect JAMin out_L and out_R from playback_1 and playback_2 respectively. If you don´t do this, your track will playback from both Ardour and JAMin.