Wednesday, December 3, 2008

The Bells are Ringing

Hey guys,

Sorry I have been neglecting Brian's Bedroom for a while. There is, however, a valid reason for this: I'm getting married in a week and a half. So, unfortunately there will be no posts until next year. But don't fear, I have a lot of things planned for next year which should improve the whole Brian's Bedroom experience.

If you're looking for stuff to read though, try some of my older posts like:

Have a fantastic Christmas and see you next year,
Brian

Monday, November 17, 2008

Using the Wii Remote to Control Hydrogen and Ardour on Ubuntu Linux

I've found two great videos on using the Nintendo Wii's Wiimote to control audio programs in Ubuntu Studio (or any linux distro). The first is posted at msound.org
Drumming With WiiMote, Hydrogen and Itouch
. The second is the prototype done by the Ardour development team using the WiiMote to control Ardour.


Drumming With a WiiMote in Hydrogen


See the original post at msound.org:
Drumming With WiiMote, Hydrogen and Itouch


If you can't access YouTube or don't have flash, becks from msound.org has connected his WiiMote as a midi controller to the hydrogen using a PERL script that can be downloaded from here. He's also using the Apple Ipod Touch in a similar fashion. Lastly, he shows that fancy tools don't increase your drumming ability :)

Using a WiiMote in Ardour


See the original Ardour post: Prototype Wiimote Control For Ardour Added.

In this video, James Bond from the Ardour Dev team connects the WiiMote up to Ardour through the options menu (You'll need to follow the instructions here). Features available are:
  • Button A starts and stops the transport (play and stop).
  • D-Pad left/right moves the play head left and right.
  • D-Pad up/down scrolls through tracks (vertically).
  • Plus and minus buttons zoom in and out.
  • Button 1 enables recording on a track (arms the track).
  • Button 2 enables recording on the session (you can then press A to start recording).
  • Button B deletes the last recording if you fluffed it (Don't ever press the B Button, 007).
  • Home resets the play head to the beginning of the track (or the selected marker).
Unfortunately, you'll need some Linux experience to get your WiiMote working with these programs. You'll also need Bluetooth on your PC. Hopefully we'll see the Ardour support in the next release.

Monday, October 27, 2008

Where to Place the Microphone when Recording Acoustic Guitars

As Mike said in the previous post, things have been a little hairy on this side, so I must apologise for the lack of new content over the last few weeks. With the formalities out of the way, let's get started with the good stuff...

When recording acoustic guitars, it is typically best to use a microphone rather than its built in pickup. The reason for this is that an acoustic guitar is known for its acoustic sound (i.e. the "natural" sound it makes in a room) rather than for the electronically reproduced sound its pickup would create. However, the quality of the recording is also highly dependent on the quality of the mic. So, this leaves you with two options: either buy a decent mic (preferably a condenser mic), or use the built-in pickup if it sounds better than your cheap mic.

Okay, so I've now convinced you to get a decent mic, and you probably think that it makes no difference where the mic is placed, as long as it's fairly close to the guitar. Well, that's simply not true, your mic placement is extremely important. Let me explain...

If you place the mic far from the guitar you will get more of a room sound than a defined guitar sound. In other words, your guitar track will sound quite spacious, as if there was a reverb effect on it. On the other hand, if you place your mic close to the guitar, you will get more guitar sound than room sound. This seems pretty obvious, and it is... but sometimes it's good to hear the basics. I can see you're a bit disappointed, so let's go a little deeper...

If you place your mic close to the bridge, you will get a very twangy sound (i.e. loud mid to high frequencies with little bass) and you will also hear the pick hitting the strings. However, if you place the mic close to the bottom of the neck, you will get a bassier/warmer sound. The reason for this is that the strings have more room to move on here than they would at the bridge, meaning that the higher frequencies of the note are produced where the string is tight and the lower frequencies are produced where the strings are loose. You may not want to place your mic right by the sound hole because it is typically too bassy and loud there, so your mic will start clipping.

You can see from the pictures below, that I like to place my mic by the bottom of the bridge, but aimed towards my strumming hand. By placing my mic here, I will get a warm mix (meaning a mix with a fair amount of bass but still with a defined mid and high tone). By aiming the mic towards the strumming hand, the sound of the pick hitting the strings will become clearer, which most artists consider to be a good thing because it adds definition. The nice thing about this setup is that if you want to remove bass later, it is simple to add a high-pass filter in Ardour (or any other DAW) to get a thinner and clearer mix.


I have recorded the sound of the guitar whilst moving the mic from the nut to the bridge and whilst moving closer to and further away from the guitar. Once you hear this, you will understand completely what I've been trying to get down in writing. The MP3 is available from the link below:

AcousticMicing.MP3 (1,619 kB)

Other posts you might find interesting:
What Gives a Guitar its Tone?
Microphone Review: Shure's SM57
Sound Proofing and Room Acoustic Basics
Sound Mixing Tips: EQ vs Volume
Stereo Panning Tips: Panning for Gold

Monday, October 20, 2008

New Ardour Recommended Plugin Effects Page

Sorry it's been so long since the last post. Brian and I have been insanely busy with work.

One of the biggest problems with using Ardour is the ridiculous number of LADSPA effects plugins that are available. It's not easy to find a good plugin and you end up wasting a lot of time trying all the different compressors, reverbs and EQ's.

To help you out, Ardour has posted a new page on plugins with recommended EQ, dynamics, reverbs and other plugins. It also tells you where to get more plugins if you're collecting them:)
If you want to recommend a plugin to Ardour, you can comment on the original plugin page annoucement.

Other posts you might find interesting:
My Favourite Linux Audio Effects
Using a Bus to Route Effects in Ardour
Audio Recording in Ubuntu Studio - Part 3: Adding Effects to the Ardour Drumtrack
An Overview of Compression
Sound Mixing Tips: EQ vs Volume

Thursday, September 4, 2008

Sorry, No Post this Week

Hi Guys,

I'm very sorry to inform you, that I just haven't had much time this week to write up a post and my weekend is looking pretty full. I will definitely have one for you next week, but for now, why don't you check out some of the topics you haven't seen before? Here is a list of some topics:

Hydrogen
Ardour
Mastering
Recording Tips
Equipment Discussions
Room Acoustics

Or you can make some suggestions or request certain content from the link below:
Comments and Suggestions

Thanks for your continued support,
Brian

Wednesday, August 27, 2008

Using a Bus to Route Effects in Ardour

When using computer audio effects, one must always bear in mind that your poor computer has to calculate the effect output everytime you play back your tracks. So when you go too crazy with effects, your computer will probably seize up, roll-over and die! To save your computer, it is important to use buses to route repeated effects in Ardour.

Okay, maybe that sounds like complete gibberish... but please bear with me and you'll soon understand what I mean. Let's take an example of a multichannel recording of a drumbeat in Ardour (i.e. one channel for snare, one for the kick drum, etc.). For each drum, you would want to add certain effects like an EQ, reverb, and compressor. One way to do this is to add the effects to each channel like in the figure below.


Since you would want the same sounding reverb on each drum, your poor computer has to calculate the same thing multiple times. This is unnecessary because you can create a bus and route all the drum channels to it and then only put one reverb on the bus. This method achieves the same sound whilst your computer does less. You can do this by following the steps below:

Firstly, you need to create a new bus. Go to Session, and click on Add Track/Bus. Configure the window that appears to look like the one shown below. i.e. select Busses and Stereo.


You now need to route all your drum channels to the bus (I have renamed mine to be DrumBus). You do this by right-clicking on the black rectangle below the volume fader (this is called the "post effects" for the track). A menu should appear and you must select New Send... Configure yours to look like the one shown below. You do this by firstly adding an output (click the Add Output button) and then selecting where you want the output to go. In this case you choose DrumBus/in1 and DrumBus/in2 from the Ardour tab on the right of the window.


Since you have rerouted the output of the each drum track, it no longer needs to be connected to the Master Bus. So disconnect it by clicking on the Output button (just above the Comments button) at the bottm of each drum channel and select Disconnect. Your drums should all be sounding through your Drum bus. This means that if you adjust the DrumBus volume, all the drums' volumes should change. It also means that any effects you use on the drum bus will be applied over the whole drum kit. The figure below shows how the bus greatly reduces the amount of reverb effects used.


Note that I have left the EQs and Compressors in each channel and not on the bus. This is done because the EQs and Compressors are set differently on each drum and thus cannot be applied to the whole kit via the bus. I hope you found this tip useful, and that your computer will also appreciate it :). A special thanks goes out to Jakob Lund for suggesting this method of adding multiple effects.

Other posts you might find interesting:
Audio Recording in Ubuntu Studio - Part 3: Adding Effects to the Ardour Drumtrack
My Favourite Linux Audio Effects
An Overview of Compression
Panning for Gold : How to Pan Tracks
Mastering Tips: A Picture Says a Thousand Words

Wednesday, August 20, 2008

Funk Hydrogen Beat Templates

What are the last words a drummer says in a band?

..."Hey guys, why don't we try one of my songs?"

As you should know if you read my previous beat templates post, Hydrogen Drumbeat Templates - A Non-drummer's Best Friend, I have been creating beat templates in order to help non-drummers write better songs in Hydrogen. The basic idea is that you download the Hydrogen song which has many different patterns in it and rearrange these patterns until it suits your song.

In this post I present you with my second ever beat template which focuses around the funk genre. These beats, however, can be used in most genres such as rock, hip-hop, pop and even metal at times. You can download this template from the link below.

The actual template: BriansBeatsFUNK.h2song (235 kB)
Note: These songs require the YamahaVintageKit available for download from here.

A MP3 sample of the template: FUNKBeatsExample.mp3 (837 kB)
The Hydrogen song of the MP3: FUNKBeatsExample.h2song (235 kB)

Once again, I have only used a closed hi-hat for the right-hand rhythm, however it is easy enough to interchange this with whatever suits you, like the ride, open hats, or crash. Just copy the same pattern on the ride, or crash and then delete the notes from the hi-hat. I hope you enjoy creating new beats!

Other posts you might find interesting:
Hydrogen Drumbeat Templates - A Non-drummer's Best Friend
Hydrogen Drumkits
My Attempt at a Hydrogen Drumkit
Pimp my Hydrogen Beats
Making a Roll Sound Realistic
Sunday Bloody Sunday Hydrogen Beat

Tuesday, August 12, 2008

Microphone Review: Shure SM57 Microphone

It is quite obvious that the better the equipment you use, the better your recordings will sound. However, as you all know, I'm a cheapo and try to focus on doing things cheaply with the best results.

The first proper pieces of equipment you should look at buying are decent microphones. This will improve your sound drastically. Different microphones have different applications, but for a cheap home setup the most important aspect to look at is versatility. You will want two types of mics: a decent instrument mic like the Shure SM57 microphone and then a decent condenser mic for practically everything else. A dynamic mic uses a diaphragm and an electromagnetic coil to induce a voltage signal, whereas a condenser mic uses a diaphragm and an electrostatic plate (capacitive effect). If that confused you, don't worry it's not too important - it just means that dynamic and condenser mics record sound differently and will thus have different sounding outputs.

The first decent microphone I ever bought was Shure's SM57 instrument/vocal mic and it has served me well. The picture below shows what it looks like:

The Shure SM57 is said to be one of the best mics for use on guitar amps, drums, wind instruments and is therefore very versatile. You can see from its frequency spectrum below, that it has an excellent mid-frequency response which gets a little wobbly towards the high-end. This explains its claim to fame, because electric guitars and drums dominate the mid-range. The SM57 is actually the exact same mic as the common SM58 vocal mic, it just doesn't have a pop filter. It can therefore be used, with quite nice results, as a live vocal mic as well. For studio vocals, a condenser mic is better as it has a flatter high-range, but as a cheapo, this mic will work there too.

Another cool aspect of this mic is what Shure calls the "proximity effect". This suggests that the closer the sound source is to the mic, the louder the bass response, meaning you can get some serious punch out of your mic. I highly recommend that you check this mic out if you are looking to improve your sound with equipment. For more information you can check out the Shure website.

Other posts you might find interesting:
Firewire Audio Recording Devices
Sound Proofing and Room Acoustics Basics
Monitor/Speaker Placement
What Gives a Guitar its Tone?
Sound Mixing Tips: High There?!

Tuesday, August 5, 2008

Audio Recording in Ubuntu Studio - Part 3: Adding Effects to the Ardour Drumtrack

Okay, by now you should have a drum track recorded in Ardour as the first step for your recording project. If not, check out Audio Recording in Ubuntu Studio - Part 2: Recording a Hydrogen Drumbeat. The drum track really is the backbone to your recording because it is often filled with the most emotion (i.e. build-ups, double tempos, break-downs etc.) However, in order to allow the recording artists to feel the full emotion of the song, we must add a few basic effects. These effects can then be tweaked towards the end of the project for the final mixdown.

Let's take a look at what we have. The figure below shows my multiple drum track recording of Sunday Bloody Sunday in Ardour.


It is important to record the drums as dry (i.e. no effects) as possible because this will make your recording more versatile. You can easily add effects to a dry recording but you cannot easily remove recorded effects. The above tracks are therefore dry and can be heard from the MP3 below.

DryDrums.mp3 (555 kB)

We now need to add effects to each drum by using Ardour's Mixer. The mixer can be opened from Ardour's Window menu by selecting Show Mixer (or pressing Alt+M). This should look similar to the one below, minus all the effects on each drum.


You can add effects to each drum by right-clicking in the black rectangle above each drum's level fader and selecting New Plugin. A list of all your installed effects will be shown, choose the relevant effect and select Connect. You should now see your effect appear in the black rectangle. The effect should still be bypassed so double click on it and a window displaying all the effect's options will appear. You can vary the effect options and click the Bypass button to switch the effect on or off.

Now that you know how to add effects, which effects best suit drums? Firstly, if you want a natural sounding drum kit, stay away from EQ. The effect which is easiest and most effective for use on drums is reverb. I used the TAP Reverberator which requires a a stereo input. I therefore used the Hilbert Tranformer to convert my mono track to a stereo one. I also used the TAP Equalizer to make my kit sound a bit more like U2's, but as I said earlier, be subtle when using the EQ. The drum track with added effects can be heard from the MP3 below.

WetDrums.mp3 (555 kB)

Compressors are very useful for drums because they make the drums sound powerful. However, you can add these during the mixing stage of the project. The early use of effects is merely to inspire the artists with a emotion-provoking drum track. For more information on some cool Linux effects, check out this post: My Favourite Linux Audio Effects.

In the next part of the Audio Recording in Ubuntu Studio series, our song should start taking shape as we add a guitar track.

Other posts you might find interesting:
Audio Recording in Ubuntu Studio - Part 1: Plan your Project
Audio Recording in Ubuntu Studio - Part 2: Record a Hydrogen Drumbeat
Overview of Compression
Hydrogen Drumbeat Templates - A Non-drummers Best Friend
Panning for Gold

Wednesday, July 30, 2008

Sound Proofing and Room Acoustic Basics

Ah, sound proofing... a term which is thrown around by newbie sound guys who have heard of it but don't necessarily know what it means. They may have heard something about egg boxes, seen really expensive studio setups or heard of some funny stuff like bass traps, suspension ceilings and the like. This one's for you little ones (Don't be offended - I was in your shoes just a few years ago).

First off, let's define the difference between sound proofing and room acoustics.

  • Sound proofing: This is essentially the method of isolating any sound from getting in or out of a space/room.
  • Room Acoustics: This deals with getting a room to sound good by using materials within the room to dampen reverb/echo and flatten out the room's frequency spectrum.
I hope you're starting to see the difference, a sound proof room can sound really bad inside and a room which has been acoustically treated can still let sound leak in and out of it.

With that said, let's ask the next question: How can I improve sound proofing and room acoustics cheaply and effectively? To answer this, I will start with sound proofing and then deal with room acoustics separately.

Sound Proofing

The only way of stopping sound from escaping or entering a room is to isolate the room from the noise source. Sound can escape from a room in two ways: either directly through an air gap or indirectly by vibrating the medium between the room and the noise source (i.e. a window vibrates quite easily and thus even when it is closed will still transfer some sound). The best sound proofing method which is used by most professional studios is to build double walls with an air gap between them. This is also expensive and thus not relevant to cheapos like us. A cheaper way of doing this is to modify an existing room by sealing all the doors, windows and anything else which provides a gap for sound to travel through. Sound is able to get through very small gaps so covering the bottom of the door and even keyholes can make a significant difference. I have sealed my doors and windows with a weather proofing foam tape. The idea is to seal any gaps which connect the inside and outside of the room. It also helps to use really think curtains or wood to cover the windows as this will also create an air gap between the windows and the room.

Room Acoustics

Sound proofing is the easy one, because it is just about sealing things and going big. Room acoustics is more difficult because if you go too wild, your room will sound bad.

There are two major materials used to better a room's sound: absorbers (soft things like mattresses, carpets, sofas, etc) and diffusers (rough things like egg boxes, randomly loaded bookshelves, etc). Absorbers stop reflections by absorbing the higher frequency sound energy whilst diffusers still reflect sound but the reflection is scattered, making it harder to hear it as a defined echo. The easiest way to think of it is to use the analogy of light. A beam of light will reflect clearly off a straight piece of tin foil but when the same beam is shone onto a crumpled piece of tin foil, the light is reflected randomly around the room. In the case of the crumpled tin foil, the whole room should become brighter just like when you use diffusers, the room fills with a warm sound as opposed to a clear echo.

With that said, please don't go out and make the same mistake most rookies do. Most rookies hear this and decide to cover their entire room with absorbers and diffusers - i.e. a room covered from floor to ceiling in carpet. This is not ideal, you want your room to sound natural and enhance your recordings - reverb is a good thing if it is controlled. You control the room's sound by placing these materials in planned places around the room. This is a complicated process and I'd bore you to death if I wrote it all in one post, so I will just throw around some thought provoking ideas and then fill in the gaps in a future post. Idea 1: Focus on eliminating the corners, because corners amplify bass and muddy sound. Idea 2: If working in a room with parallel walls, place absorbers or diffusers on one wall only to eliminate sound waves bouncing back and forth. Idea 3: A thick carpet on the floor always helps. Idea 4: A bookshelf loaded randomly with books can act as a cheap diffuser. Idea 5: Read this awesome article: Acoustic Treatment for Home Studios. Idea 6: Keep reading my blog for other tips because I'm not finished with you :).

Other posts you might find interesting:
Monitor/Speaker Placement
Sound Mixing Tips: Bringing an Instrument Out of the Mud
What Gives a Guitar its Tone?
Sound Mixing Tips: High There?!
Sound Mixing Tips: Panning for Gold

Friday, July 25, 2008

Please Rate my Blog

Hey guys,

I havely recently added a poll to my site which allows you to rate my blog (see the right sidebar). Please leave your vote by selecting one answer and clicking Vote. This feedback will help me to see how good my stuff is and whether it needs improving.

Also feel free to add suggestions and constructive criticism as comments to this post to help me improve this site.

Thanks for your support,
Brian

Monday, July 21, 2008

Hydrogen Drumbeat Templates - A Non-drummer's Best Friend

How do you know the stage is level?

...the drummer is drooling out of both sides of his mouth.

Yeah, yeah... I've heard them all. I know as a non-drummer it is very difficult to think like a drummer. Especially when most non-drummers reckon that drummers don't have the capability of thinking much :). However, to make a decent sounding drumbeat from a drum machine, you need to "think" like a drummer.

This can be quite a task, but don't fear! I, as a drummer, have done the thinking for you and made a bunch of Hydrogen beat templates which you can simply piece together to make a drumbeat. The concept is simple - all I have done is made a Hydrogen Song using various rock patterns. You can download this song and simply rearrange the patterns to suit you. Below is a link to the first beat template I have made:

BriansBeatsROCK.h2song (217 kB)
Note: These songs require the YamahaVintageKit available for download from here.

It consists of several basic 4/4 rock beats with a few fills. There is also a crash and drag pattern which can be overlaid on any of the pieces in order to pimp them. This sounds a bit weird but I have made an example song which shows just how easily these beat templates can be used. This can be downloaded from the link below:

ROCKBeatsExample.h2song (217 kB)
ROCKBeatsExample.mp3 (747 kB)

I have only used a closed hi-hat for the right-hand rhythm, however it is easy enough to interchange this with whatever suits you, like the ride, open hats, or crash. This is just my first attempt at beat templates. If I feel they are successful I will make more templates to suite the various genres such as Punk, Metal, Jazz, Funk, Latin and Pop. So please let me know by means of commenting on this post if you find these templates useful.

Other posts you might find interesting:
Hydrogen Drumbeat Templates: FUNK Beats
Hydrogen Drumkits
My Attempt at a Hydrogen Drumkit
Pimp my Hydrogen Beats
Making a Roll Sound Realistic
Sunday Bloody Sunday Hydrogen Beat

Wednesday, July 16, 2008

Audio Recording in Ubuntu Studio - Part 2: Record a Hydrogen Drumbeat

Okay, so you've planned your recording project like I told you to do in Audio Recording in Ubuntu Studio - Part 1: Plan your Project. You now want to create a Hydrogen drumbeat as the backbone to your track.

To begin, start up JACK and then Hydrogen. You can begin messing around with beats and patterns to get a feel for the program. If you want a more in depth description of the Hydrogen interface check out this post: Hydrogen Drum Machine Basics.

If you are unsure of the drumbeat that you will use for the song, just write a simple one and loop it for the entire song. As long as it is set at the same timing and at the same tempo, you can replace the beat with a better one at a later stage. A useful tip to remember: always start the beat off with a count-in, it will make the recording process a lot easier and you can always remove it later. For our recording project, we are using a Hydrogen beat for U2's song: Sunday Bloody Sunday - it is available for download here: Sunday Bloodly Sunday Hydrogen Drumbeat.

Once you have finished your beat, and you can play along to it in Hydrogen, you want to record it into Ardour. So start up Ardour and create a project with whatever name makes you sleep better at night. The Ardour interface should have only one track called Master. All the future tracks will be linked to the Master bus and then output to your soundcard. You now want to create enough tracks to record your drumbeat into. Hydrogen can either output one stereo track or a stereo track for each instrument/drum. I prefer to use multiple outputs, because it's more versatile - but if you are just laying down a simple beat, rather use the single stereo output (it is easier). I explain how to enable multiple outputs in Hydrogen in this post: Multiple Outputs for Hydrogen.

To add a track in Ardour, click on File and select Add Track. A window appears which allows you to chose how many tracks you want to add and whether those tracks are going to be stereo or mono.

If you are using Multiple outputs, select mono and add about six tracks. You can then change the names of the tracks by clicking in the track name and typing what you like. Use relevant names like snare, kick, crash, etc. it will only make it easier for you later.

If you are using just one stereo output, select stereo and add one track only. Name it Drums.

You now need to connect the Hydrogen outputs to the Ardour inputs, you do this from JACK. Open the JACK connections kit by clicking on the Connect button. This looks like the below figure.


Expand the Hydrogen tab under Outputs and the Ardour tab under Inputs. You now need to connect the relevant drum outputs to the inputs of Ardour. The Hydrogen outputs are unfortunately labeled as numbers, so you have to look in Hydrogen and determine which number links to which drum. Pan each Hydrogen instrument/drum fully to the left from the Hydrogen mixer. Then link only the left output of the instrument to the mono Ardour input.

Once all your connections are linked up correctly, you can start recording. Go back to Ardour and change the tempo so that it is the same as that found in Hydrogen. You can change it by double-clicking on the number (just above the Master track) and typing in the relevant tempo. You must now arm all of the tracks by clicking on the red circle found by each track's name (Only armed tracks will be recorded to). Once all the tracks are armed, select the Record Button (red circle) on the Ardour transport bar and then select the Play button - Ardour is now recording any activity in the armed tracks. Quickly go back to Hydrogen and click the Play button. If you observe the tracks in Ardour, you will see the drum waves being recorded. When the song is finished, press the Stop button in Ardour. Your Ardour project should look something like the below figure.


Your drumbeat has now been captured into Ardour and you can leave Hydrogen behind. It is important to drag your recorded drumtrack into time with Ardour's time, if you don't, Ardour's click track will not be in time. This is done by clicking on the drumtrack and dragging it till it aligns with the bar lines of Ardour. In Audio Recording in Ubuntu Studio - Part 3: Adding Effects to the Ardour Drumtrack, I will be discussing how to add effects to your drumbeat in Ardour.

Other posts you might find interesting:
Audio Recording in Ubuntu Studio - Part 1: Plan your Project
Sunday Bloody Sunday Hydrogen Beat
Hydrogen Drumkits
Pimp my Hydrogen Beats
Making a Roll Sound Realistic
Hydrogen Drumbeat Templates - A Non-drummer's Best Friend

Monday, June 30, 2008

Sound Mixing Tips: EQ vs Volume

Here's a tip for live mixing and mastering, but can probably be used in any area of audio recording: If you can't hear an instrument, it's probably because of its EQ - not its volume. Before you push up that volume fader, try boosting the instrument's defining frequencies.

Here's an example. I was mixing for our church, and the band was playing one of those numbers that relies heavily on the keyboard strings. The mix was fine otherwise, but you couldn't hear the strings. The desk I was using had two mid-frequency pots, so I boosted the 250hz (low frequency) one until I could hear the strings. This brought out the full presence of the strings.

Increasing the volume wouldn't have had the same effect. Each instrument has a frequency that defines it - especially in a mix. For strings on a keyboard, I've found that frequency at the low end. Not surprisingly, it's the high end on acoustic guitars (usually 7-10khz and up).

Vocals are trickier, a whole subject on their own. I find that each person has their own 'peak' area that clears up their mix. Males are around 3-5khz and females at around 4-7khz.

To find the defining frequency, create a new peak and boost it until you can hear exactly what that frequency you're dealing with. I usually go full ball here. Then sweep it up and down the frequency spectrum until you hear the instrument come out. Then take the peak down to a reasonable level.

Other posts you might find interesting:
Speaker Placement
High There?!
Panning for Gold
Live Sound, Monitors and Pepper Spray
Audio Recording in Ubuntu Studio - Part 1: Plan your Project

Thursday, June 26, 2008

Hydrogen Drum Machine Basics

This post aims to cover the basics around the Hydrogen Drum Machine interface and hopefully get a newbie feeling comfortable with the setup. Firstly, start up JACK and then Hydrogen. Once in Hydrogen, you want to select a drumkit which will suit your song the best. You can do this by opening the View menu and selecting Show Drumkit Manager. This will look like the figure below:


You can select which drumkit best suits you and then click Load Drumkit. If you don't like the default selection of kits, there are quite a few you can download from:
Hydrogen Drumkits or Hydrogen-music.org Drumkits

Once you have chosen your kit, you can familiarise yourself with the Hydrogen interface. The components of the interface are explained below:

  • The Pattern Editor

    This is where you write each drum pattern or fill by selecting which drum/instrument (y-axis) makes a sound at what time (x-axis). The figure below shows what this looks like.


    As you can see from the above figure, the time at which an instrument is meant to play, is represented by a dot. The vertical line below each note represents its volume. If you click and drag the line down, the volume of that particular note will decrease. Attached to the pattern editor window is some useful stuff shown in the figure below:


    Explaining the figure from left to right: The pattern number and name; the size defines how long a pattern is; the resolution defines how many notes can fit into that size pattern. The recording bar allows you to record what you play on your computer keyboard or via a MIDI input. Play around with the pattern size and resolution to get a better idea of what it does.
  • The Song Editor

    This is where you schedule when each pattern will play during the song. As seen in the figure below, many patterns make up an entire song and these patterns can be repeated or overlapped. You can also change a pattern's name by right clicking on its name and selecting Properties.

  • The Mixer

    This allows you to change the level/volume of each drum and also allows you to add effects or pan the instruments. The mixer is shown below:


    You can add effects by clicking on the FX button in the bottom right corner of this window. This will open the window seen below.


    A total of four effects can be added to each instrument. These are added by clicking on the Edit button and selecting an effect you like. The wetness (or level) of the effect can then be varied on each instrument by using the four dials found above each volume fader on the mixer.
  • The Transport Bar

    The transport bar is shown in the figure below. It allows you to play back either one pattern or the whole song. The tempo is shown as large numbers which represent the beats per minute. This tempo can be altered by selecting the + and - buttons found next to it or by double clicking on the numbers. The transport bar basically allows you to navigate your way around the song and to play it back.

  • The Instrument Editor

    This window is not too important for making a Hydrogen song but can be used to edit the drum sounds. To find out more about this window, read my post on How to Make a Hydrogen Drumkit.
Those are the basics of the Hydrogen interface, now you can get cracking with making some awesome drumbeats

Other posts you might find interesting:
Hydrogen Drumkits
My Attempt at a Hydrogen Drumkit
Pimp my Hydrogen Beats
Making a Roll Sound Realistic
Sunday Bloody Sunday Hydrogen Beat

Thursday, June 19, 2008

What gives a Guitar its Tone?

Hey guys,

I've come across an excellent set of articles all about guitar tone. Have you ever wandered what makes a guitar sound the way it does? These articles deal with exactly that. Each part of the guitar affects its tone. The author cleverly discusses these parts individually. They are:

  1. The Strings
  2. The Neck
  3. The Body
  4. The Bridge
The author explains these concepts fundamentally from the types wood to the pickups. I find that the basic idea with the tone of any instruments or a room, is simply that hard surfaces (eg. a brick wall) reflect high frequencies whilst soft surfaces (eg. a soft sofa) absorb the high frequencies.

Using light as an analogy to sound works well because they are both waves and both reflect and refract off materials. Think of hard surfaces like a mirror - they reflect almost all the light. Soft or rough surfaces diffuse the sound, similar to how a glazed bathroom window diffuses light.

You will notice that guitar tone is governed by the same fundamental rules. Hard materials brighten the tone and soft materials seem to boost the low frequencies, creating a warmer sound. All the same, the above mentioned articles are definitely worth a read because they go into way more detail about which woods or materials create which sound.

Other posts you might find interesting:

Microphone Review: Shure SM57 Microphone
Speaker Placement
High There?!
Panning for Gold
Audio Recording in Ubuntu Studio - Part 1: Plan your Project

Wednesday, June 4, 2008

Audio Recording in Ubuntu Studio - Part 1: Plan your Project

Okay, so you've decided that you want to record a song from your home. You've also decided, like the rest of us cheapos, that you are going to use freeware. If you haven't yet decided, I recommend you use Ubuntu Studio (for why see here). Ubuntu Studio is armed with these great programs: the Best Programs in Ubuntu Studio.

When recording a project you never want to go in Swinging Blindly (especially if this is your first time). So here are a few steps to ensure that your project doesn't run out of steam half way through.

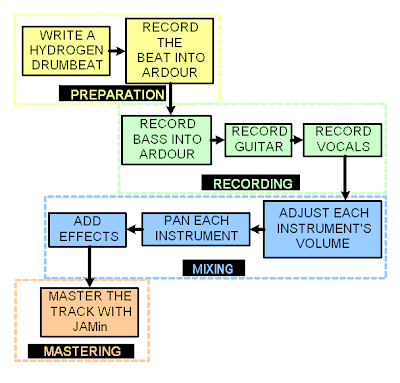
Firstly, you need to understand that there are four parts to any recording project:

  1. Preparation (setting up tempo, ensuring the song arrangement is finalised, etc.)
  2. Recording (getting your instruments' sounds into your computer)
  3. Mixing (Getting your levels right, panning each instrument, etc.)
  4. Mastering (Getting your track to sound professional)
With these steps in mind we can set up a flow diagram leading us through the project from start to finish. As an example, I plan to record a cover version of Sunday Bloody Sunday by U2. The flow diagram for my project is show below.

You can see from the figure that every instrument has its place in the recording process. It is important to put the drum track down first, even if you are using real drums. This is because it sets up the tempo for the song and provides a nice backbone for the other instruments to play along to. It is imperative that you play to a metronome, it'll be hard at first but it will always make the project easier and the song tighter. Yeah, I know...you're too cool for a metronome... you think it will destroy the emotion of the song... for the people who think that (like I did) - shut up, and listen 'cause I know, first hand, that you need a metronome.

I plan to create a blog post for every step in the process over the next few weeks. So stay tuned for the basics as well as the not-so-basics of hydrogen, recording guitar, bass, vocals, mixing, mastering, etc...etc...etc... Exciting times await!

Check out the next part of this project: Audio Recording in Ubuntu Studio - Part 2: Record a Hydrogen Drumbeat

Other posts you might find interesting:
Audio Recording in Ubuntu Studio - Part 2: Record a Hydrogen Drumbeat
Audio Recording in Ubuntu Studio - Part 3: Adding Effects to the Ardour Drumtrack
Beginner's Guide to Ubuntu Recording
What Exactly is Mastering For?
Speaker Placement

Monday, June 2, 2008

Sunday Bloody Sunday Hydrogen Drumbeat

U2's song, Sunday Bloody Sunday has quite a complicated drumbeat, so I decided to make a Hydrogen song out of it. I have done this for three reasons:

  1. So that drummers can look at the Hydrogen drumbeat patterns and work out how to play it.
  2. So that guitarists can play along to a decent drumbeat without getting their hands dirty.
  3. Because its just too cool.
I used the YamahaVintageKit by ArtemioLabs (Downloadable from here). Note that you will need this drumkit to play the Hydrogen song (.h2song format). The song is available from the links below:
Other posts you might find interesting:
How to make a Hydrogen Drumkit
Making a Roll Sound Realistic
Multiple Outputs for Hydrogen
My Attempt at a Hydrogen Drumkit
Hydrogen Drumkits

Wednesday, May 28, 2008

My Favourite Linux Audio Effects

Ubuntu Studio comes with hundreds of pre-loaded effects. Although I haven't gone through all of them, I have come across severval effects I found useful. I have described each effect below and also provided a screenshot in order to get a basic idea of what controls they have.

  • Equalizers

    Equalizers are used to individually vary the gain of several frequencies.

    Multiband EQ (by Steve Harris)

    This EQ has 15 frequencie faders (50 Hz - 20 kHz). Each fader's gain can be increased to 30 dB and decreased to -70 dB. See figure below.


  • TAP Equalizer-BW (by Tom Szilagyi)

    This EQ has 8 floating frequency faders along with gain and bandwidth faders. i.e. You must select the frequency that you want to boost/attenuate and then alter the gain. The bandwidth [usually referred to as quality (Q)] determines how much the surrounding frequencies are affected i.e. width of the notch.
  • Reverbs

    Reverbs essentially simulate a room/hall sound by introducing echoes.

    Gverb (by Juhana Saderharju)

    I found that this reverb was quite easy to use and produced fairly decent results with a bit of tweaking. The faders are pretty self-explanatory.

    Plate Reverb (by Steve Harris)

    This is a very simple reverb for quick and easy use. The damping fader determines how much of your higher frequencies are included.

    TAP Reverberator (by Tom Szilagyi)

    This is by far the most versatile of the three reverbs I've mentioned. The most important thing to remember is to set your reverb type. It defaults to Afterburn which sounds pretty bad. I like the Halls, Rooms and Plates.

  • Compressors

    Compressors allow you to either bring down louder parts or bring up the softer parts. This allows you to get more punch out of your mix. Check out my
    Overview of Compression post for more information.

    SC4 and SC4 mono

    The SC4 compressor is for stereo tracks and the SC4 mono is for... can you guess?...mono tracks. It has all that I require from a compressor as well as a neat Gain Reduction meter which shows you when it is working and how much is being compressed. The faders can be complicated if you haven't used a compressor before so please check out my post:
    Overview of Compression if you are confused.

  • Amplifier Simulators

    These effects aim to simulate how a certain type of amplifier would make an instrument sound.

    TAP TubeWarmth (by Tom Szilagyi)

    This cool effect, recommended by a fellow Brian's Bedroom reader here, basically makes you track sound fat (or phat if you're a gangster). It does this by simulating a tube amplifier which typically have a warmer sound. Drive is the essentially warmth and the Tape-tube Blend is basically a wet/dry mix fader.

Other posts you might find interesting:
Overview of Compression
High There?!
Live Sound, Monitors and Pepper Spray
Speaker Placement
Panning for Gold

Wednesday, May 21, 2008

How to Make a Hydrogen Drumkit

This post explains how to create a Hydrogen drumkit without editing any code i.e. a point-and-click method. This may sound complicated but it is actually really easy. So when you decide to do this, simply refer back to this post and follow the steps. Here we go:

  1. Open Hydrogen (No-brainer), and make sure the Instrument Editor window is open.
  2. Go to View and select Show Drumkit Manager. Select any drumkit and click Load Drumkit. This will be used as a base for your new kit.
  3. I will assume that you already have the relevant sound files, you want to create the kit with, saved into a file (.wav, .flac, .au or .aiff formats).
  4. Select the relevant instrument you want to edit, i.e. Snare, and view it in the Layers tab of the Instrument Editor window. You should see something similar to the below figure:
  5. Select the blue horizontal block and click on the Delete Layer button.
  6. Now you want to add your own sound, so click on the Load Layer button. This opens a file browser which allows you to choose your sound.
  7. Select your sound and click Open. Your sound is now loaded as an instrument.
  8. If you want to use multiple layers for each instrument, i.e. soft and loud snare hits, you must load another layer. This is done by repeating step 6.
  9. With multiple layers you need to edit the volume at which each layer is activated. This is done by shrinking the blue horizontal bars in the Instrument Editor. As seen in the below figure, the two layers look like steps. This means that at high volumes the 1st layer will be used and at low volumes the 2nd layer is used (i.e. left is quiet and right is loud).
  10. You can rename your instrument by clicking on its name in the Instrument tab of the Instrument Editor.
  11. The Instrument tab also has some cool knobs which can be used to edit your instrument's sound. The most important of these is the instrument gain which allows you to raise or lower your instrument's volume to match the other parts of the kit.
  12. The Layers tab also has cool knobs. The gain knob edits the selected layer's gain and the pitch knob makes the selected layer sound either higher or lower.
  13. To add more instruments, simply select another instrument and repeat steps 6 to 12.
  14. Once you are happy with your kit, you have to SAVE it. This is done by visiting the Drumkit Manager mentioned in step 2. Select the Save tab and replace all the details with your own. Make it official by clicking on the Save button. You have now made your own drumkit. I recommend that you save periodically whilst making your kit - you don't want to lose all your work.
  15. Once you feel your kit is complete and you haven't done anything illegal like stealing proprietary sounds. Export it by using the Export tab in the Drumkit Manager and then post a link to it both as a comment to this post and on the Hydrogen Forum. Check out 4shared.com for free file hosting/sharing.
Let me know if this information was useful by rating this post.

Other posts you might find interesting:
Making a Roll Sound Realistic
Pimp my Beats
Multiple Outputs for Hydrogen
My Attempt at a Hydrogen Drumkit
Hydrogen Drumkits

Monday, May 12, 2008

How to Capture Audio from Video

I have recently been trying to capture audio from some video clips that I have, and just didn't know how to do it. I thus stumbled upon an awesome way using Ubuntu Studio's default movie player, Totem Movie Player.

It is very simple, let me explain...

  • Open JACK and start it.
  • Open your video of choice using Totem.
  • Go to Totem's Edit menu and select Preferences.
  • Select the Audio tab in preferences.
  • Use the scroll down menu to change the Audio Output Type to AC3 Passthrough
  • Your movie audio is now passed through JACK and can be recorded with any recording package which uses JACK i.e. Ardour.
  • The Totem audio outputs can be viewed from JACK's Connect menu.
And if you're wandering why on Earth something like this would be useful...well, you can always choose your favorite line from a movie and convert it into an SMS/Text message tone.

Other posts you might find interesting:
Beginner's Guide to Ubuntu Audio Recording
Live Sound, Monitors and Pepper Spray
My Favourite Linux Audio Effects
Hydrogen Drum Machine Basics
Microphone Review: Shure's SM57

Monday, April 21, 2008

High There?!

Do your recordings lack definition? Are the drums hard to hear with everything else playing? Is your mix a giant mess? Are you feeling depressed?

Well, I may have an answer to help all of the above (except the last one). First, let me ask you: do you use your high-end frequencies (10 k - 20 kHz)? If not - you definitely want to pay attention. If you do - you can add your comments and help the poor sods I mentioned in the previous sentence.

The average person's hearing ranges from 20 - 20000 Hz. So, when you see the faders on your EQ going up to 20 kHz - don't ignore the last ones! This is why: the frequencies above 10 kHz give definition and add a much needed 'sparkle' to certain instruments. Also, if you use the whole frequency spectrum, you can create a feeling of space or bunching. Another way of doing this is by using panning, but these two techniques should be used hand-in-hand. For further information on panning see my post: Panning for Gold.

Cymbals' frequencies are typically between 2 k and 20 kHz. Thus, if your drum track has the highs cutoff, they will lack definition and will not stand out. Other instruments which require a 'sparkle' factor are acoustic guitars, pianos and vocals. Vocals sound best when boosted in the low-frequencies (100 - 200 Hz) and high-frequencies (10 k - 20 kHz). Boosting the mid-frequencies (800 - 5000 Hz) can actually make the vocals more muddy and this is a common mistake.

To conclude: we have learned that the high-frequencies are important - don't forget them or reduce them on your EQ. It is for this very reason that condenser mics are better than dynamic ones. Condenser microphones have a better high-end response and thus have more DEFINITION.

Monday, April 7, 2008

Live Sound, Monitors and Pepper Spray

This one's more suited to those of you who do live sound mixing. When mixing a live band , the monitors on stage are often blasting louder than the actual speakers. This can make mixing the sound a hellish experience, especially if you're mixing a church or similar event where the audience is likely to form an angry mob.

If you've ever had that experience, then here are some tips to keep you from further mobbings:

  • Use enough monitors

    The fewer monitors there are, the louder they'll be. The musicians on stage will be so desperate to hear themselves that the monitors might even be distorting. In big stage concerts each musician can have two or more monitors each.

  • Place the monitors correctly

    Placement of monitors can make a huge difference. Make sure that each musician can at least see the monitor they are listening to. Move them so that there is nothings obscuring the sound. A monitor behind the piano is useless to piano player.

    Try changing the angle of the monitor. If possible, face the monitor directly at the musician. Also, the closer the monitor is to the musician, clearer it will be.

  • Stand on the stage

    This is something I do a lot. Go and stand by each musician. Listen to what they can hear, and also what's missing.

Saturday, April 5, 2008

Firewire Audio Devices

Using Linux unfortunately limits one to certain hardware. This is because the companies which make these devices do not create Linux drivers. This is a downfall, but one which is easily avoided - don't buy equipment before you know it works in Linux! How do you check this? Well thats why I'm writing this article.

When buying audio hardware you would want a multi-channel recording facility. In other words, you want a mixing desk or soundcard which can record to multiple channels in Ardour or another DAW simultaneously. In my opinion the best way to do this is to use firewire...it is super-fast and quite well supported in Linux. FFADO (previously known as FreeBoB) is an organisation which creates firewire support within Linux. Here is a link to FFADO's list of devices they support: FFADO Devices Support. Make sure that any firewire products you want to buy appear on their list before you buy it!

The Mackie ONYX and M-Audio NRV-10 mixers are both excellent choices for home recording projects. I heard of Linux-users who are happy with the PreSonus Firepod which is essentially a multiple input firewire soundcard. There are many audio devices out there which work exceptionally well in Linux... just please make sure you do your homework before you fork out tonnes of cash on something.

Other posts you might find interesting:

Microphone Review: Shure SM57 Microphone
The Best Programs in Ubuntu Studio
Audio Recording in Ubuntu - Part 1: Plan your Project
Audio Recording in Ubuntu - Part 2: Recording a Hydrogen Drumbeat
Hydrogen Drum Machine Basics

Tuesday, April 1, 2008

Panning for Gold

Hey guys, sorry I've been away a while. To ease my guilt, I'm writing a post about panning with an excessively cheesy title.

Panning is exceptionally important for allowing each instrument in a mix to be heard without detracting from the song itself. It can also be used for funky effects, which can make one dizzy, or for highlighting certain sounds. It is easiest to understand panning visually. Please meet my visual aid buddies in the figure below: Burt, George, and Jim. They will be dancing around the stereo plane to illustrate my point.


Refer to the figure below. If all my visual aid buddies are placed in the center of the "stereo plane" (i.e. equal left and right volumes), they are very difficult to see. Luckily each of my buddies looks a bit different. If they didn't look different, one could be hiding behind the other. This is similar to a piano sounding different to a guitar. When they are played with the same pan setting, you can still differentiate between them but when two guitars are played with the same pan setting, it will sound either like a mess or as if one guitar has a chorus effect.

In the figure below, two of the buddies are panned close together, near the center. They are both quite visible but are blending together well. The green guy looks as if he is a super-geek or smells really badly because he is standing out. This is exactly the same idea for panning different instruments... the guys in the center crowd are gonna have the bigger punch, but unless they are slightly spaced out, they will just be a mess. The guys who choose to stand out will have less punch but more definition. However, I warn you that if the nerd stands out too far he can sound really bad. Also, if you space everything out too much and don't have an "in-crowd", you will have no punch and basically land up with a bunch of bad-smelling nerds.

Yes, that's right... the secret of panning is merely peer pressure. I'm sorry if this explanation is really childish. To make up for it, here are some real tips:

  • Start with your rhythm instruments... i.e. drums and bass.
  • Mute everything else and setup your drum's panning similar to as if you were sitting behind the kit... i.e. your snare and bass close to center, cymbals on far left and right, and toms going from left to right.
  • Next unmute the bass and slowly move the panning fader from far left to far right. You should hear where the punchiest point is. There is no solid rule - you simply have to find it.
  • Next unmute the guitar and repeat the same process as the above step.
  • Continue this method through all the instruments and then move on to the vocals.
  • The lead vocals should always be near the center and background vocals shouldn't be panned too far to the left or right unless you are trying to be arty.
  • Make slight adjustments until you are happy.
  • A word to the wise: be very careful when panning anything too far to the right or left, no one really likes nerds :)
Panning is useful for both live and recording mixes so don't neglect it if you have the facility. You're the sound-guy... be creative.

Other posts you might find interesting:
Monitor/Speaker Placement
Sound Mixing Tips: Bringing an Instrument Out of the Mud
What Gives a Guitar its Tone?
Sound Mixing Tips: High There?!
What Exactly is Mastering For?

Wednesday, March 26, 2008

Delayed Posts

Hey guys,

Sorry I haven't posted recently, night shift at work has been taking its toll. I will definitely have some good stuff for you next week.

Later,
Brian

Tuesday, March 11, 2008

Making a Roll Sound Realistic

This post explains how to make realistic sounding drum rolls with a drum machine. In order to sound like a drummer, you need to think like one. Firstly, I need to define, for those non-drummers, that there are two main types of rolls:

  1. The single-stroke roll: The hand pattern is Right (R), Left (L), Right, Left...and the sticks do not bounce at all. Often heard in Nirvana's songs.
  2. The multiple-bounce roll: The hand pattern is R,L,R, L...and the sticks bounce several times with each stroke. Often heard at the circus before anything "exciting"* happens. It is also often heard in songs played by any half-decent drummer.
* Exciting is in inverted commas because I don't believe much exciting happens at the circus :-)

With that in mind, we can edit the volume of each hit to mimic the movements of the drummers arms. Every drummer has a weaker arm, which will produce a quieter and different sounding hit. It produces a different sound because it has to hit the drum head at a different point to that of the other hand. The easiest way to mimic this with a drum machine is to make the each weaker hand's hit about 1/2 to 3/4 the volume of the stronger hand's. Being a right-handed drummer, I always choose the left hand to be weaker. This means that a single-strike roll will look like the figure below in Hydrogen:

For the multiple-bounce roll, one needs to make the sticks sound like they are bouncing. The first way to do this can be really painstaking and yields rather poor results. For this method, you add each bounce sound in as a snare hit but with a much quieter volume. This is seen below:

A better sounding and easier way of doing this is to use a drumkit which has a drag/ghost note prerecorded (A drag is a drum note which lets the drumstick bounce). The hydrogen kit that I made (available here) has a drag note and produces a simpler multiple-bounce roll seen below.

Here is and mp3 of each of the above rolls: Rolls.mp3 (285 kB). The first roll is a single-stroke roll followed by the two multiple-bounce rolls, the first is uses no drag/ghost hits and the second does.

These are the easiest ways of getting realistic drum rolls out of a machine. Bare in mind that a machine will never sound exactly like a drummer, there are just too many variables. Hydrogen also has a cool humanize dial which makes each beat slightly out of time randomly. This can be useful, but don't overdo it.

Other posts you might find interesting:
How to make a Hydrogen Drumkit
Pimp my Beats
Multiple Outputs for Hydrogen
My Attempt at a Hydrogen Drumkit
Hydrogen Drumkits